|
|
|
|---|
|
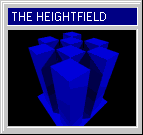
Creating heightfields with POVLAB
Ę Lets engross our knowledge about heightfields (HF). According to the quote ╗a picture says more than thousand words½, we will now create a HF-image, to demonstrate the relation between the image-files and the resulting HFs. Follow the step-by-step-guide to create the first HF-image ... Ę Step 1 - load or create a completely empty POVLAB- scene and insert a cube. Step 2 - with the mouse or via the ╗manual-setup½ scale the X-value of the cube to [X=1.5], assign a blue-white-checker as texture and scale the texture to a value near 0.5 for the X-, Y- and Z-direction. Step 3 - create an omni-light and translate it to the position [X=0, Y=10, Z=10]. Step 4 - create a camera at the position [X=0, Y=0, Z=7]. Step 5 - choose the command ╗material½ | ╗finish½ and click on the box. In the finish-dialogbox, activate the ╗ambiance½- switch and set an ambiance-value of [100]. Step 6 - choose the command ╗render½ | ╗final½, deactivate the option for ╗antialiasing½ and render the scene at a resolution of 320 x 240 pixels.
The first heightfield Ę After the rendering we have got a nice checkered box, which we will now use as a HF-image. IMPORTANT: before we do that, we should rename the scene and save it with the new name (e.g. "HFTUT002.SCN"). |
Ę This is neccessary, because the TGA-file, that we now will use as a HF-image has the same name as the scene itself. Rendering the upcoming HF would therefore overwrite our HF-image.
Ę After you have renamed the scene, you can delete the box. In the next step, go to the ╗Objects½-menu and choose the command ╗Heightfield½. After this you will be presented a file-open-dialog to select the HF-image. The image-files are usually located in the directory, that you have specified in the ENVIRONMENT-settings. Ę Select the TGA-file from the last scene and you will see, that POVLAB evaluates the image and inserts a peculiar looking thing - a heightfield. Now - assign a texture of your choice to the HF, align the lights and cameras and render the scene.
Ę So we can derive one major fact: darker parts of an HF-image will lead to zones of lower altitude within the HF. Zones with brighter colors will therefore result in higher HF-levels. NOTE: this definition is not quite correct. HF-images like GIFs store the color-information in color-palettes. The first entry in this palette is assigned to the lowest level in the HF (and the last entry is therefore assigned to the highest level). Due to the fact, that in most cases the darkest color of an image will have palette-entry ╗0½, we can get along with the above mentioned theory. |
| Chapter B/Page 2 |
|
Mail to webmaster:
support@povlab.org This page was last modified on: 1996-07-22 |
Mail to the author of the POVLAB-Tutorial:
lepschi@source.co.at |