|
|
|
|---|
|
CREATING AN EMPTY TEMPLATE SCENE
In this section, we will set up a empty template-scene, which you can use for your upcoming works. A camera and a light-source are also being inserted, so that you can control the objects in the camera-viewport. |
|
The empty scene
· When POVLAB starts, a completely empty scene is displayed. This scene does not contain any cameras or light-sources, which are are neccessary to render a scene. Also all four viewports are shown. Creating a camera · To create a camera, you have to click on the »camera«-button, which is topmost in the »button-control«-cluster (normally in the upper right corner of the screen). Doing so, nine further controls will be displayed underneath the main button-controls. In this sub-menu, you will find button called »create«, which is the first in the sub-menus group. · When you click on »create« a camera is immediately inserted into the scene. A camera is always displayed in its default color (normally blue) as a line and two points. The first point is marked with a caption, which shows the current number of the camera (a scene can contain up to ten cameras). This first point (it looks like this: o[1+]) represents the »lens« of the camera. · The second marker indicates the direction, the lens of the camera is pointing to. Therefore this point is called and referred to as the »look-at«-point in some menus and dialogboxes. |
Camera coordinates
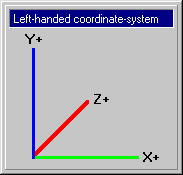
· In POVLAB, the so called »left-handed«-coordinate system is used. To understand this, consider the following: Make a fist with left hand and make your thumb point straight upwards. Also straighten the index finger, so that it points away from you. Finally the middle finger is moved to a position, which has a 90 degree angle corresponding to the index finger. · In this postion, the thumb points to the positiv section of the Y-axis, the middle finger shows the direction of the positive X-axis and the index finger indicates the positive Z-axis (see picture below).
|
| Chapter A/Page 4 |