The texture-parameter dialogbox
· If you want to change texture-parameters manually, then you can avtivate the »texture-parameters«- dialogbox by choosing the command »material« | »finish«.
· All in all there are 13 parameters to alter, but we just can't explain them all. So we grab out a few, just to demonstrate the vast possibilities. In all of the following images, the bottom-shapes show the texture without any changes, whereas the upper shapes have been altered in the respective parameter.
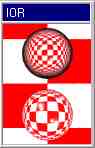
Index of refraction (IOR)
|
· When light passes through meterials of diffrent density, the light-beams are bended to a certain angle. This angle is called the »refraction«. In science, the »index of refraction« is used, to describe the relative density of a meterial. Check out the image to see, what different IOR-values can do to the same glass-texture.
|
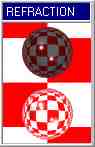
Refraction
|
· Do not mix up this parameter with IOR!. The »refraction«-value determines the amount of light, that can pass through the object. From the physicists point of view, there are only 2 values: 0 or 1. Anyway, you can enter values inbetween 0 and 1, though this can darken the object in a somewhat peculiar way.
|
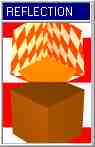
Reflection
|
· The »reflection-parameter« determines the amount of direct light, that is - YES, how did you guess? - reflected from an object. With this parameter, you can create mirror-like effects. High reflective- values cause longer render-times, because of the additional light-beams the ray-tracer has to compute.
|
| |
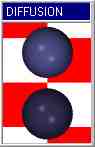
Diffusion
|
· In a closed room, light can arise in two ways: 1. direct light from light- sources and 2. indirect or »diffuse« light, that is reflected from other objects. The diffusion-parameter determines the relation between direct and indirect light an object gets illuminated with. Higher values result in a brighter appearance of the object.
|
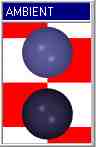
Ambiance
|
· Because in the real world a place without light is hardly to find, the ray-tracer adds a bit of background- light to the texture-definition, when the »ambient«-parameter is set. This results also in a brighter surface and looks as if the object would emit light by itself. the values for ambiance may vary from 0% to 100%.
|
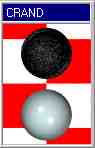
Crand Graininess
|
· Certain surfaces like concrete or sand appear darker then they are, because their surface is very rough (grainy) and therefore lots of shadows are casted. You can apply graininess to any kind of texture through this keyword, but keep in mind, that in animations, this feature causes a »flickery« appearance of the object.
|
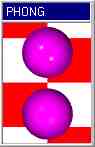
Phong Highlights
|
· The »Phong«-value can be used to create highlights upon objects, which makes them look shiny (polished). You can also vary the »Phong-size«, which determines the size of the highlighted spot. Used with other keywords (»metallic«, »specular« etc.), it can produce any kind of glance and shinyness you like.
|
|