
|
|
|---|
|
Setting up the rendering parameters
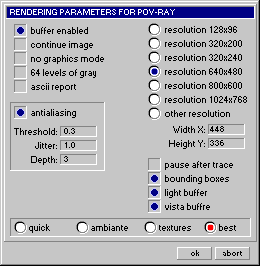
· Now we are only a few mouse-clicks away from starting POVRAY. POVLAB provides in its »render«-menu a couple of buttons, which start the render process with different quality-settings (e.g.: »quick«, »preview« etc.). · If you want to lay a hand on the render-parameters yourself, then you should choose the command »render« | »final«. Doing so, the following dialogbox will appear... 
· In the upper right corner you can specify the image format. Additionally to the given presets, you can enter a custom-size if neccessary. |
· The upper left corner contains the following output settings: buffer enabled - POVRAY renders an image from the top to the bottom and line by line. After one line has been computed it is written to disk. You can save render-times (but not too dramatic), if you set this option to »enabled«. POVRAY then writes the scan-lines into the memory and accesses the disk, only when the buffer is full. continue image - if you have interrupted the rendering, than you don't have to trace the image anew. Activating this option will force POVRAY to render only those parts of the image, which have not been rendered in the first place. no graphics mode - activating this option, supresses the image-output during the rendering. 64 levels of gray - used for fast-renderings (drafts, previews etc.). ascii report - checking this option produces a log-file of the rendering process.
· In the middle of the dialogbox you can find the settings for »antialiasing«. Antialiasing can dramatically improve the quality of the output-image, but it increases the render-times. So for previews you should disable this option. A detailed explanation of the antialiasing- parameters can be found in the POVRAY 3.0-manual. Also in the POVRAY-manual you will find the detailed informations about the »light«- and »vista«-buffers and the »automatic bounding«-options (lower right corner of the dialogbox). · With the rest of the switches you can determine, if POVRAY should pause, after the image is rendered (so that you can see the statistics) and in which quality the image should be traced. Check out which of the settings fulfill your needs for speed an accuracy. · END OF CHAPTER A · |
| Chapter A/Page 29 |