
|
|
|---|
|
Setting up the camera (position, angle ...)
· In the early stages of a scene, when you're about to do some test-renderings, it can be useful, to create more than just one camera. This has the advantage, that you can immediately change the viewing angle, without changing the main-cameras position and look-at-point. All you have to do for this, is to click on one of the cameras in the scene. · Also interesting is the »fov«-control, that you will find in the »camera«-menu. FOV means »field-of-view« and specifys the cameras focus. To say it in short words: With the FOV-feature you can easily test different camera-lenses like »zoom«, »normal lens«, »wide- and ultra-wide angle« or »fisheye« and so on. · Experiment a little with this option, but don't forget, that short lenses (wide-angles) distort the perspective - regardless if this is intended or not. Special light-/scene-effects (backgnd. color & fog) · There are some options, which influence the looks of the whole scene. The first one is the »background- color«, which you can set via the »render«-menu. Click on »background« and you will be presented a dialog box, where you can alter the color itself using the »red«-, »green«- and »blue«-channels as well as the »hue«, »saturation« and »luminescence«-values. · In addition you can also introduce »fog«. You can reach this feature, when you choose the command »render« | »fog«. POVLAB supports two kinds of fog: »constant-fog and »ground-fog. · The »constant fog« has no specific altitude, which means that it has the same density everywhere in scene. Nevertheless, you can vary the look of the constant-fog with the following parameters: |
· »Fog-distance«: this setting determines at which distance (seen from the camera) 36.8% of the scene are still visible (check out the POVRAY-manual for more details about the »36.8%«). »fog-turbulence«: there is nothing on this world as regular as a fog with a constant density. If you want more »action«, you can add turbulence to the fog, which makes sections of the fog more or less dense then the rest.

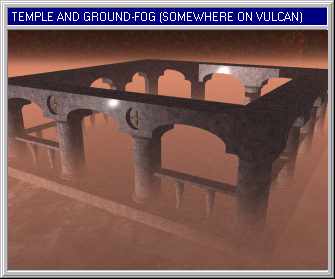
· The second type of fog is the »ground-fog«. It is the more »sophisticated« form of fog and has two additional parameters: »fog-offset«: this value describes, under which position on the Y-axis the fog has a constant density and »fog-altitude«: this parameter sets the distance (in grid-units) after which the fog reaches zero-density. In the picture above, the base of the temple is at Y=-4. So we let the ground-fog start somewhere around fog-offset=-1. After one grid unit, the fog should reach zero-density - therefore the correct parameter for the altitude is fog-altitude=1. If you want to use ground-fog, don't forget to activate the »layered«-switch in the fog-dialogbox. |
| Chapter A/Page 28 |