|
|
|
|---|
|
Image-maps, plugins and extruded obejects
· As we take a close look at the grandfather-clocks case, we can see something interesting on the frontside - apparently we've found some sort of ornament (check out the picture below). 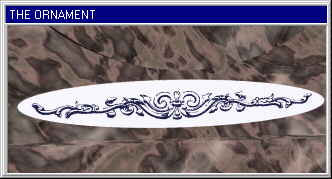
· Though this ornament is a simple one, it would be very hard to model it by just using primitives or splines. But a full 3D-workout of this ornament is not neccessary (phew !!). All we need is a good image of the ornament, which we can project onto the surface of a POVLAB- object using the »image-mapping«-feature. How to activate the image-mapping · Since it has something to do with the surface of an object, you can find this function in the »material«- menu. Clicking on the »mapping«-button and on an object will bring up the following dialogbox (see picture on top of the right column). |
· The »mapping-dialogbox« has two sections: A - for the image-mapping (the left side of the DB) and B - for the bumb-mapping (the right side). Of course POVLAB can't create an image-map, therefore you should already have an appropriate picture before you enter this dialog.
· As you heard in the chapter about heightfields, you will need a special application for creating image-maps. PaintShop PRO does a great job in this matter as well, because it can export or convert images to many formats including TGA and GIF, two of the image-map-formats that are supported by POV-Ray 3.0. NOTE: There is an image-map-, bumb-map and heightfield-library introduced, with this section of the tutorial. This library will be availiable in August or September 1996. The images in this tile-shop are free of charge but must not be distributed commercially. Click here to enter the download-shop. |
| Chapter B/Page 11 |
|
Mail to webmaster:
support@povlab.org This page was last modified on: 1996-08-04 |
Mail to the author of the POVLAB-Tutorial:
lepschi@source.co.at |