|
|
|
|---|
|
Artwork on the frontside
· The four columns sure look neat, but what we need is a little bit of artwork to make the scene interesting. The first thing we will add is some sort of banister. To do so, maximize the front-viewport. press »C« on the keybord to center the scene and zoom in, until the two columns in the middle fill out the whole viewport. 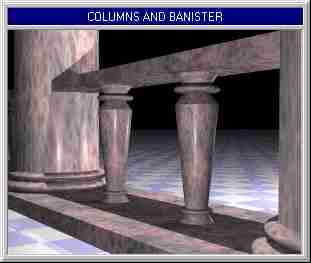
· The banister we will create consists of two boxes, four truncated cones and two toruses (see picture above). Because we have to do our work precisely, we will mostly use the »manual-setup«- dialog for scaling, rotating and translating. Follow the step-by-step-guide to build a banister inbetween the two middle- columns. Step 1 (the box on top): Create a box via the menu »Objects« | »Box« (use any name for the object, that is convenient). The cube has its uniform expansion in the X-/Y-/Z-axis and has to be scaled and translated. So press the button »modify« | »manual« and click on the box, to get to the setup-dialog. |
· Enter the following values in the these fields:
Scale      X:  3.250  Y:  0.125  Z:  0.500
Translate  X:  0,000  Y: -0.350  Z:  0.000
Press the »ok«-button and you will see, that the box now reaches from one column to the other, so that there is no gap. Step 2 (the box at the bottom): To create this shape we will copy the top-box with the »modify« | »copy«- command. You can drag the copy onto any position and release the mouse-button there, because we will make the box fit the scene using the setup-dialog. In the setup- dialog enter the following values in the these fields: Scale X: 3.250 Y: 0.150 Z: 1.400 Translate X: 0,000 Y: -2.850 Z: 0.000· The bottom-box of the banister should now perfectly fit to the bottom-boxes of the columns. If it doesn't, check the columns bottom-boxes »translate«-coordinates with the manual-setup-dialog. Step 3 (the upper truncated cone): To be frankly, friends - a normal cone would have done also, but the creation of a normal cone is far too simple for artists like us. So we will use the »truncated cone« (TC), a shape which is defined by its top- and its bottom-radius. There are a few things, you should keep in mind: A - a TC can only be drawn with the mouse (as we will see), B - you have to draw the major radius before the minor radius and C - the end of the TC with the minor radius is always - and in every viewport - pointing out of the screen. · For the current purpose you should ... A - switch to the top-view B - choose the command »Objects« | »Truncated cone«, C - select the top-view as the viewport to draw the cone in and D - click on a location in the viewport where not too many objects are around (continued on next page). |
| Chapter A/Page 12 |