|
|
|
|---|
|
CREATING AND TRANSLATING CAMERAS AND LIGHT SOURCES
This section will show you, how to create cameras and lights in our empty template scene. Besides that, you will also learn, how to translate (re-position) these objects. |
|
Altering the camera vectors
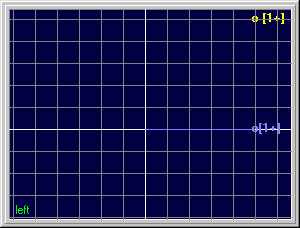
· After you have created a camera (as described on page 4 of this section), you can alter the position- and the look-at--vector with the »translate«-command. You can access this command, when you click on the camera-button. · After that a sub-menu button-cluster is displayed, wherein you will find the translate-button. Klicking on this control will change the mouse cursor into a small square. Move this cursor to the location point of the first camera and click on the small square next to the caption ("[1+]"). After you've done this, you can freely move the lens of the camera. · Clicking on the first point in the different viewports ("front", "left" etc.) lets you alter the camera position in all three dimensions. The look at point is changed in exactly the same way. You only have to click on the second point of the camera object (the one without the caption). Creating and translating an omnilight · To create an omnilight, you have to press the »light«-button. Four further buttons for the availiable light types are then displayed under the main button controls (omni, spotlight, area, cylindrical). Click on »omni« and a point light-source will be inserted into the scene on the coordinates [X:0, Y:0, Z:0]. In POVLAB, the default-representation-color for light-sources is yellow. · To translate the light source, select the »translate«- function for light sources, click on the point next to the caption ("[1+]") and move the light source to the desired position - that's all! To set the camera and the omnilight to the proper position in our template scene, you have to do the following: A - create the camera and leave it on position [X:0, Y:0, Z:-5] with the look-at vector pointing to [X:0, Y:0, Z:0]. |
B - create an omnilight and translate it to the location [X:-5, Y:5, Z:-5]. After you have set the camera and light to these coordinates, the scene - seen through the left-viewport - should look like this ...
 Setting the coordinates manually
· Press the tool-button for the desired object (»camera« or »light«). In the camera-menu, you can select the »setup«-button afterwards. Clicking on a camera in one of the viewports, will bring up an appropriate dialogbox. If you want more infos on positioning cameras, lights and objects, than click here. · For setting the position of light sources manually, press the »light«-button and select a type of light source from the sub-menu (for example: »omni«). This will bring up another sub-menu, where you will find the »setup«- button. Press this control and click on a light source, to get the property-dialog-box. NOTE: You cannot set or change the hotspot- and fall-off-values of light sources, nor can you zoom in/out in the viewports as long as there are no objects (cube sphere, etc.) in the scene. If your scene is set up, you should save it - for example - under the filename "standard.scn". |
| Chapter A/Page 6 |